SketchUp is known to create models which fail in the slicer or during the print. It's a good idea to use a resource to check for flaws/errors in the model. These errors can be quite varied. All3DP has a somewhat misleading presentation purporting to provide resources to repair damaged models, but the linked page merely describes those factors which are to be considered when examining a model. This particular link is included for completeness.
Non-manifold builds, intersecting faces, non-intersecting faces (holes) and others are listed in the linked article and are to be avoided/repaired prior to printing.
Some slicers will identify and auto-repair a model if the "damage" is not too severe.
Windows 10 and up includes 3DBuilder, which will also identify flawed models and attempt to repair them. Despite being bundled with Windows 10, it is a capable program for checking a build.
Meshmixer (windows) also has Analysis, Inspector to identify problem areas, and also to repair them. For your model, Meshmixer does not identify any failure points, making a repair unwarranted.
An online repair resource from NanoDLP exists but does not display any information, merely repairs the model and makes the repair STL file available for download. There may be others of value online, use search terms "online 3D model repair."
If you can identify the slicer used by the library, it's possible/likely that it is a free download. PrusaSlicer, for example, will provide notification when a suspect model is loaded and will auto-repair. As noted above, your model does not have flaws; loading the model will provide other resources such as slicing and g-code preview as requested in your question. Other slicers are available for free download as well, including Cura, as referenced in the video.
The overhang mentioned by @FarO is a valid concern and the video provides a useful solution to the possibility of drooping during the print.
Angus of Maker's Muse on YouTube has a couple of videos covering design considerations to reduce or eliminate the need for supports, a version of the video linked by @FarO:
It's similar in respect to adding material to the model, creating a change from overhang to bridging.
I've had to print a counter-bore with the major diameter on the build plate. This created an unsupported bottom of the counter-bore "floating" above the plate. To fill this area with supports via the slicer would have been detrimental to the print quality and possibly resulted in impossible to remove supports.
The Angus' method served well in that I created a cylinder 0.4 mm larger in diameter than the minor diameter of the hole, placed directly in the center. This cylinder created a bridge from the major diameter, with an overlap of one nozzle width, which was easily snapped clear. One could have even less of an overlap by using 0.2 mm delta.
In the case of your vacuum nozzle, the overhang could be changed from the method presented in the video to a few gussets perpendicular to the surface under the overhang. This would "bookend" the overhang, creating bridging of the shelf, rather than drooping.
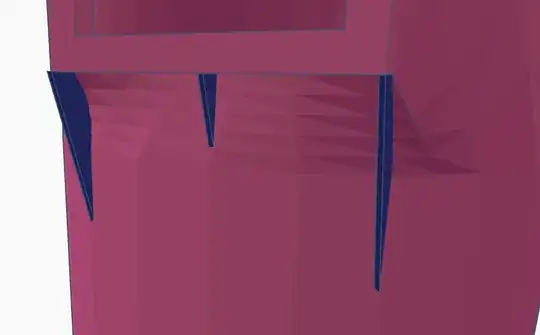
This image above is a hastily thrown-together example of the suggested option. The difference between the left and right support panel is the result of sloppy and hasty creation on my part, not a reflection of the model construction.
Addressing the question in the comments regarding print time, multiple factors are to be considered. Print speed for the specific filament type is the first. PLA can tolerate relatively high speeds compared to other filaments, especially flexible types. Layer height is also a consideration. A model printed at 0.300 mm layer height will print more quickly than one printed at a common 0.150 mm or 0.200 mm height. Layer lines will be much more visible on non-vertical faces when printed at 0.300 millimeter layer height, but for a utilitarian purpose such as yours, that's insignificant, in my opinion.
The slicer program selected will also be a factor. At 0.300 mm height, one of my slicers presents a 7 hour 22 minute result, while another suggests 8 hours 32 minutes. As both are in excess of your allowed time, you'll have to improvise.
One option, based on the duration limitations, would be to segment the model in a manner to allow easy assembly after printing, then glue the segments in place. Super-glue-type adhesives are prone to becoming brittle and fail, while solvent types are more likely to create a better bond. A popular adhesive, from my experience as well, is E6000.
If you split this model, use a horizontal plane cut to maintain the vertical orientation. It will provide the fastest printing. You can also create the plane cut at the overhang area, removing the need for manipulating support structures.


